⭐简单说两句⭐
✨ 正在努力的小叮当~
💖 超级爱分享,分享各种有趣干货!
👩💻 提供:模拟面试 | 简历诊断 | 独家简历模板
🌈 感谢关注,关注了你就是我的超级粉丝啦!
🔒 以下内容仅对你可见~作者:小叮当撩代码,CSDN后端领域新星创作者 |阿里云专家博主
CSDN个人主页:小叮当撩代码
🔎GZH:
哆啦A梦撩代码🎉欢迎关注🔎点赞👍收藏⭐️留言📝

文章目录
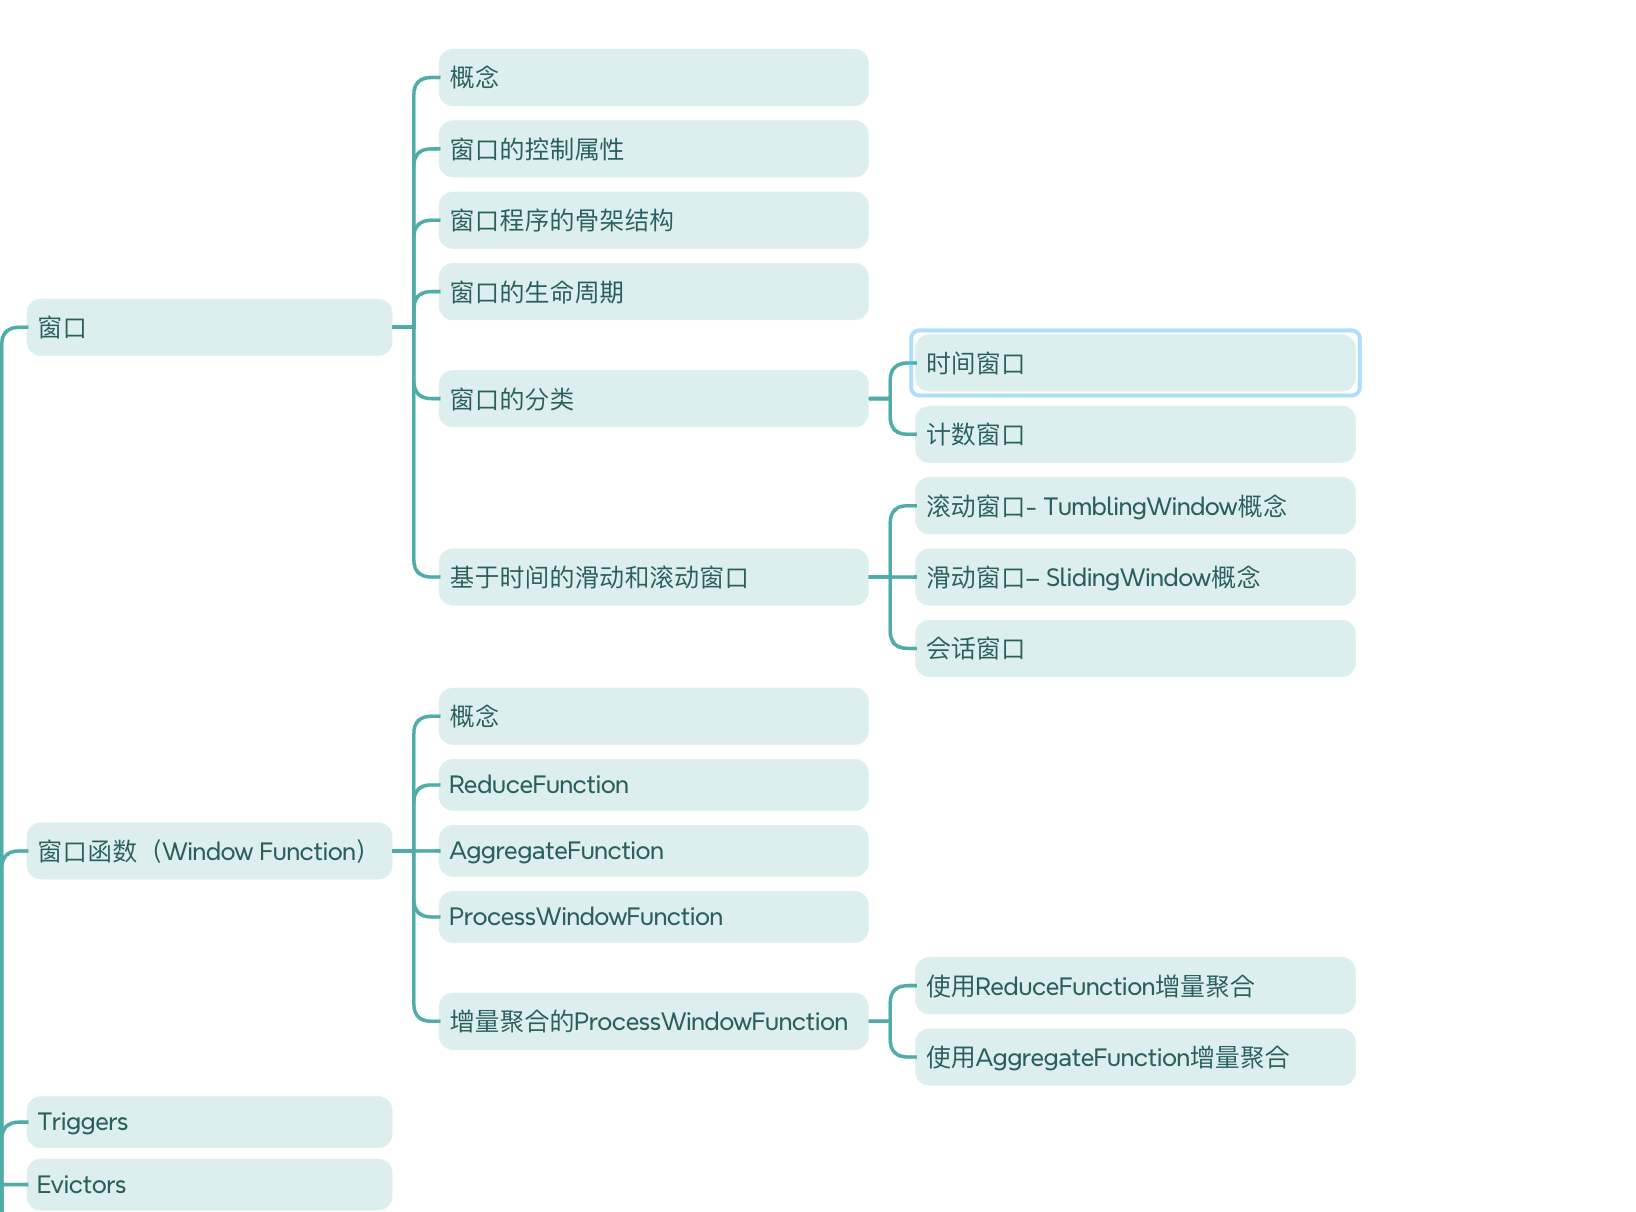
- Flink窗口
- 😍窗口
- 😎概念
- 🐯窗口的控制属性
- 🕹️窗口程序的骨架结构
- ⏰窗口的生命周期
- ⌨️窗口的分类
- 💿基于时间的滑动和滚动窗口
- **📲滚动窗口- TumblingWindow概念**
- 💸**滑动窗口– SlidingWindow概念**
- 💡会话窗口
- 🩷**代码实战**
- 🚀窗口函数(Window Functions)
- 🚦概念
- 🏖️ReduceFunction
- 🏝️AggregateFunction
- 🏜️ProcessWindowFunction
- ⛰️增量聚合的 ProcessWindowFunction
- 🏔️使用 ReduceFunction 增量聚合
- 🗻使用 AggregateFunction 增量聚合
- 🧡Triggers
- 💛Evictors
Flink窗口
😍窗口
😎概念
Flink 认为 Batch 是 Streaming 的一个特例,所以Flink 底层引擎是一个流式引擎,在上面实现了流处理和批处理。而窗口(window)就是从 Streaming 到 Batch 的一个桥梁。Flink 提供了非常完善的窗口机制。
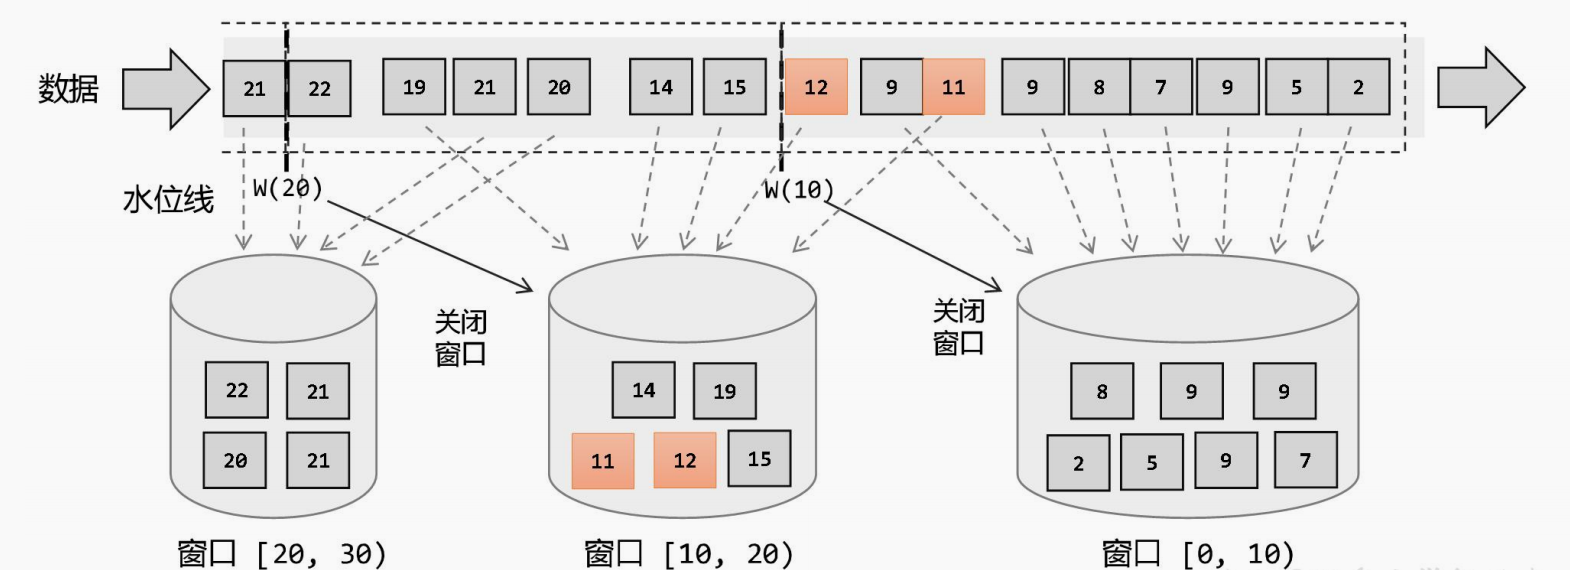
在Flink中,窗口其实不是一个框,应该理解成一个桶,Flink可以把流切割成有限大小的多个存储桶( bucket),每个数据都会分发到对应的桶中,当达到触发窗口计算的时候,就会对桶中的数据进行处理。
🐯窗口的控制属性
窗口的控制属性有两个:窗口的长度、窗口的间隔
窗口的长度(大小): 决定了要计算最近多长时间的数据
窗口的间隔: 决定了每隔多久计算一次
举例:每隔5分钟,计算最近24小时的热搜词,24小时是长度,每隔5分钟是间隔。
🕹️窗口程序的骨架结构
一个Flink窗口应用的大致骨架结构如下所示:
Keyed Window --键控窗口
// Keyed Window
stream
       .keyBy(...)               <-  仅 keyed 窗口需要
       .window(...)              <-  必填项:"assigner"
      [.trigger(...)]            <-  可选项:"trigger" (省略则使用默认 trigger)
      [.evictor(...)]            <-  可选项:"evictor" (省略则不使用 evictor)
      [.allowedLateness(...)]    <-  可选项:"lateness" (省略则为 0)
      [.sideOutputLateData(...)] <-  可选项:"output tag" (省略则不对迟到数据使用 side output)
       .reduce/aggregate/apply()      <-  必填项:"function"
      [.getSideOutput(...)]      <-  可选项:"output tag"
Non-Keyed Window
// Non-Keyed Window
stream
       .windowAll(...)           <-  必填项:"assigner"
      [.trigger(...)]            <-  可选项:"trigger" (else default trigger)
      [.evictor(...)]            <-  可选项:"evictor" (else no evictor)
      [.allowedLateness(...)]    <-  可选项:"lateness" (else zero)
      [.sideOutputLateData(...)] <-  可选项:"output tag" (else no side output for late data)
       .reduce/aggregate/apply()      <-  必填项:"function"
      [.getSideOutput(...)]      <-  可选项:"output tag"
在上面,方括号([…]) 中的命令是可选的。这表明 Flink 允许您以多种不同的方式自定义窗口逻辑,使其最适合您的需求。
**首先:**我们要决定是否对一个DataStream按照Key进行分组,这一步必须在窗口计算之前进行。经过keyBy的数据流将形成多组数据,下游算子的多个实例可以并行计算。windowAll不对数据流进行分组,所有数据将发送到下游算子单个实例上。决定是否分组之后,窗口的后续操作基本相同,经过windowAll的算子是不分组的窗口(Non-Keyed Window),它们的原理和操作与Keyed Window类似,唯一的区别在于所有数据将发送给下游的单个实例,或者说下游算子的并行度为1。
⏰窗口的生命周期
Flink窗口的骨架结构中有两个必须的两个操作:
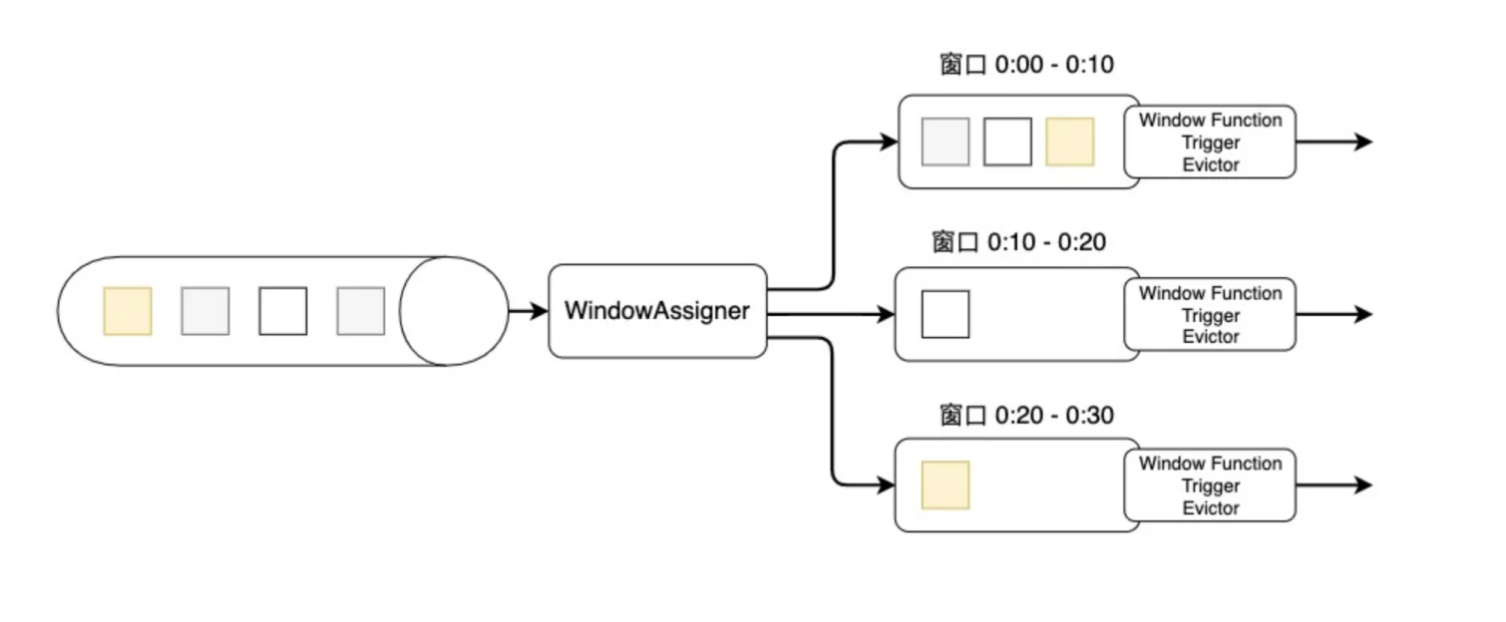
- 使用窗口分配器(WindowAssigner)将数据流中的元素分配到对应的窗口。
- 当满足窗口触发条件后,对窗口内的数据使用窗口处理函数(Window Function)进行处理,常用的Window Function有reduce、aggregate、process。
其他的trigger、evictor则是窗口的触发和销毁过程中的附加选项,主要面向需要更多自定义的高级编程者,如果不设置则会使用默认的配置。
上图是窗口的生命周期示意图,假如我们设置的是一个10分钟的滚动窗口,第一个窗口的起始时间是0:00,结束时间是0:10,后面以此类推。当数据流中的元素流入后,窗口分配器会根据时间(Event Time或Processing Time)分配给相应的窗口。相应窗口满足了触发条件,比如已经到了窗口的结束时间,会触发相应的Window Function进行计算。注意,本图只是一个大致示意图,不同的Window Function的处理方式略有不同。
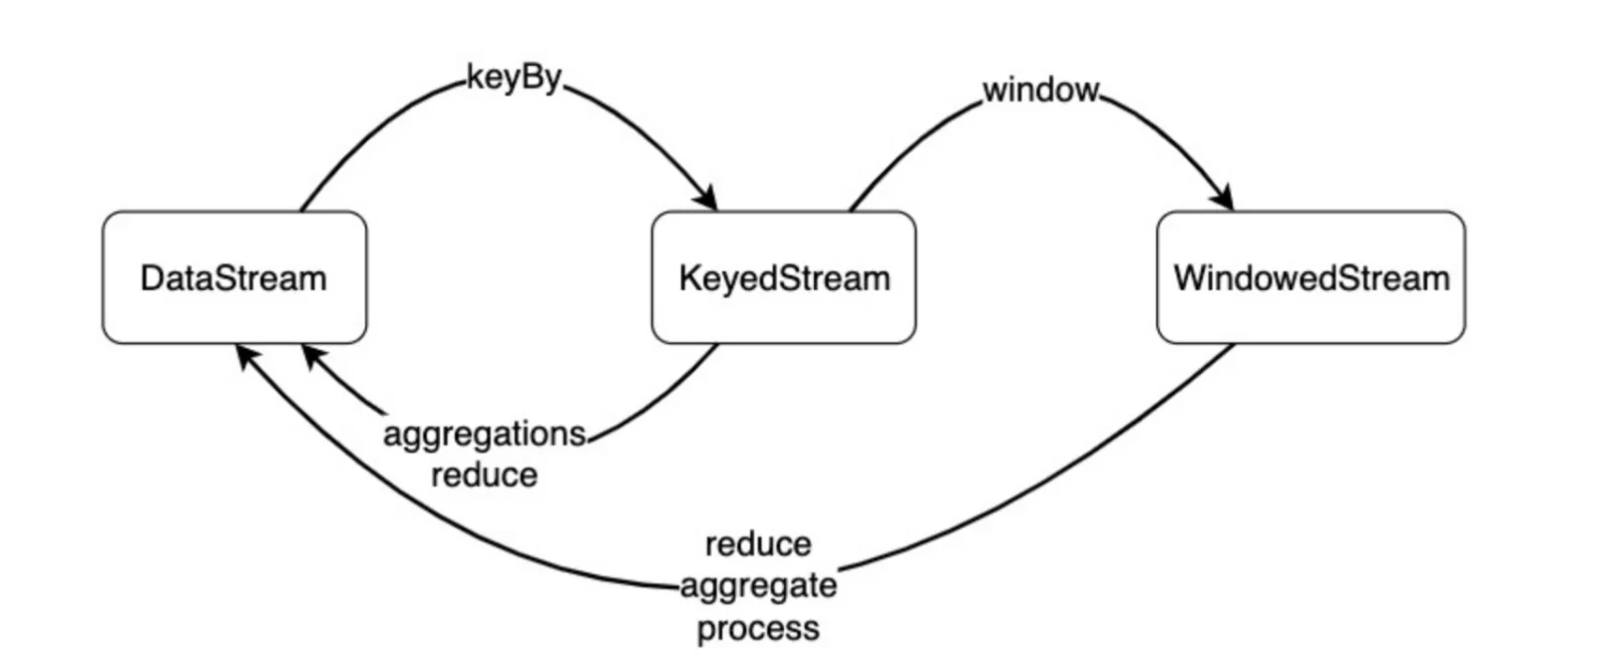
从数据类型上来看,一个DataStream经过keyBy()转换成KeyedStream,再经过window()转换成WindowedStream,我们要在之上进行reduce()、aggregate()或process()等Window Function,对数据进行必要的聚合操作。
⌨️窗口的分类
在 Flink 中,窗口的应用非常灵活,我们可以使用各种不同类型的窗口来实现需求。接下来我们就从不同的角度,对Flink 中内置的窗口做一个分类说明。
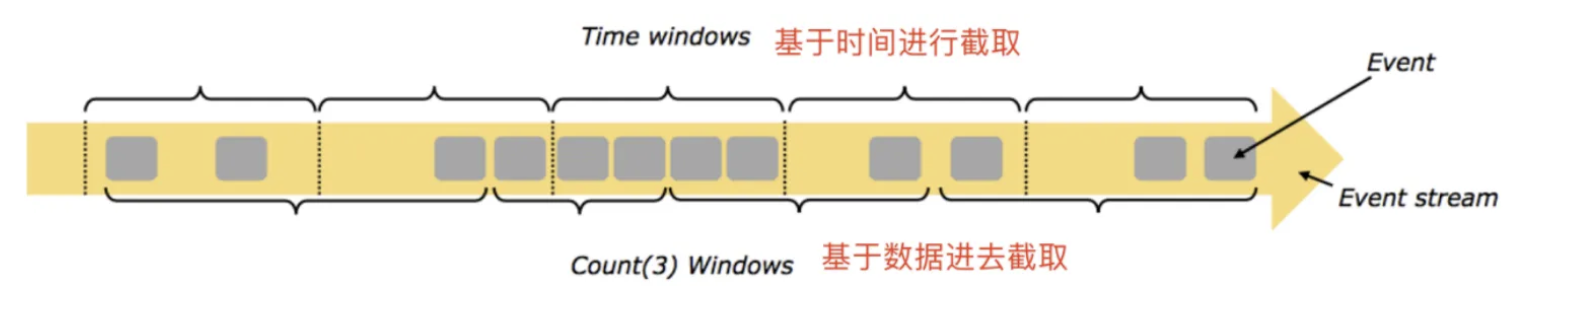
在Flink中,窗口一般可以分成两类
- 时间窗口
- 计数窗口
时间窗口(TimeWindow):按照时间生成Window,可以结合到点发车来理解
滚动时间窗口:每隔N时间,统计前N时间范围内的数据,窗口长度N,滑动距离N
滑动时间窗口:每隔N时间,统计前M时间范围内的数据,窗口长度M,滑动距离N
会话窗口:按照会话划定的窗口
计数窗口(CountWindow):按照指定的数据条数生成一个Window,与时间无关,可以结合人满发车来理解
滚动计数窗口:每隔N条数据,统计前N条数据
滑动计数窗口:每隔N条数据,统计前M条数据
💿基于时间的滑动和滚动窗口
📲滚动窗口- TumblingWindow概念
我们先看下官方的说法:
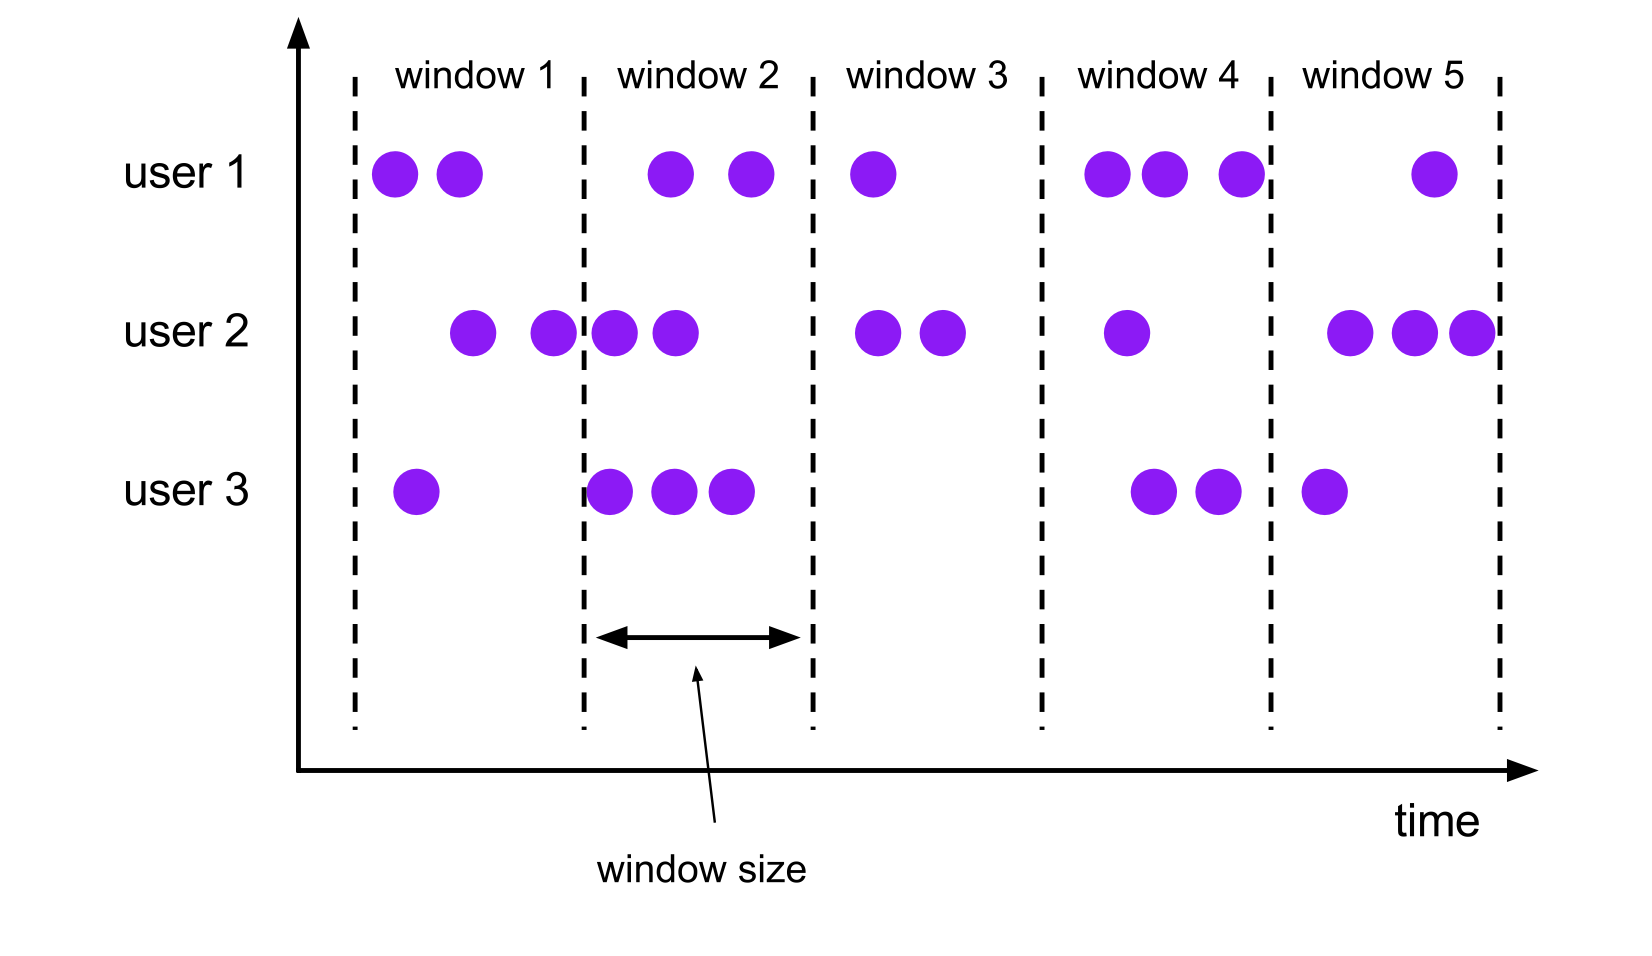
滚动窗口的大小是固定的,且各自范围之间不重叠。 比如说,如果你指定了滚动窗口的大小为 5 分钟,那么每 5 分钟就会有一个窗口被计算,且一个新的窗口被创建(如下图所示)。
下面的代码展示了如何使用滚动窗口。
DataStream<T> input = ...;

// 滚动 event-time 窗口
input
    .keyBy(<key selector>)
    .window(TumblingEventTimeWindows.of(Time.seconds(5)))
    .<windowed transformation>(<window function>);

// 滚动 processing-time 窗口
input
    .keyBy(<key selector>)
    .window(TumblingProcessingTimeWindows.of(Time.seconds(5)))
    .<windowed transformation>(<window function>);

// 长度为一天的滚动 event-time 窗口, 偏移量为 -8 小时。
input
    .keyBy(<key selector>)
    .window(TumblingEventTimeWindows.of(Time.days(1), Time.hours(-8)))
    .<windowed transformation>(<window function>);
时间间隔可以用 Time.milliseconds(x)、Time.seconds(x)、Time.minutes(x) 等来指定。
如上一个例子所示,滚动窗口的 assigners 也可以传入可选的 offset 参数。这个参数可以用来对齐窗口。 比如说,不设置 offset 时,长度为一小时的滚动窗口会与 linux 的 epoch 对齐。 你会得到如 1:00:00.000 - 1:59:59.999、2:00:00.000 - 2:59:59.999 等。 如果你想改变对齐方式,你可以设置一个 offset。如果设置了 15 分钟的 offset, 你会得到 1:15:00.000 - 2:14:59.999、2:15:00.000 - 3:14:59.999 等。 一个重要的 offset 用例是根据 UTC-0 调整窗口的时差。比如说,在中国你可能会设置 offset 为 Time.hours(-8)。
看了官方的例子,我们再来看一个实际的~
流是连续的,无界的(有明确的开始,无明确的结束)
假设有个红绿灯,提出个问题:计算一下通过这个路口的汽车数量

对于这个问题,肯定是无法回答的,为何?
因为,统计是一种对固定数据进行计算的动作。
因为流的数据是源源不断的,无法满足固定数据的要求(因为不知道何时结束)
那么,我们换个问题:统计1分钟内通过的汽车数量
那么,对于这个问题,我们就可以解答了。因为这个问题确定了数据的边界,从无界的流数据中,取出了一部分有边界的数据子集合进行计算。
描述完整就是:每隔1分钟,统计这1分钟内通过汽车的数量。窗口长度是1分钟,时间间隔是1分钟,所以这样的窗口就是滚动窗口。

那么,这个行为或者说这个统计的数据边界,就称之为窗口。
同时,我们的问题,是以时间来划分被处理的数据边界的,那么按照时间划分边界的就称之为:时间窗口
反之,如果换个问题,统计100辆通过的车里面有多少宝马品牌,那么这个边界的划分就是按照数量的,这样的称之为:计数窗口
同时,这样的窗口被称之为滚动窗口,按照窗口划分依据分为:滚动时间窗口、滚动计数窗口。
💸滑动窗口– SlidingWindow概念
我们还是先看下官方的概念
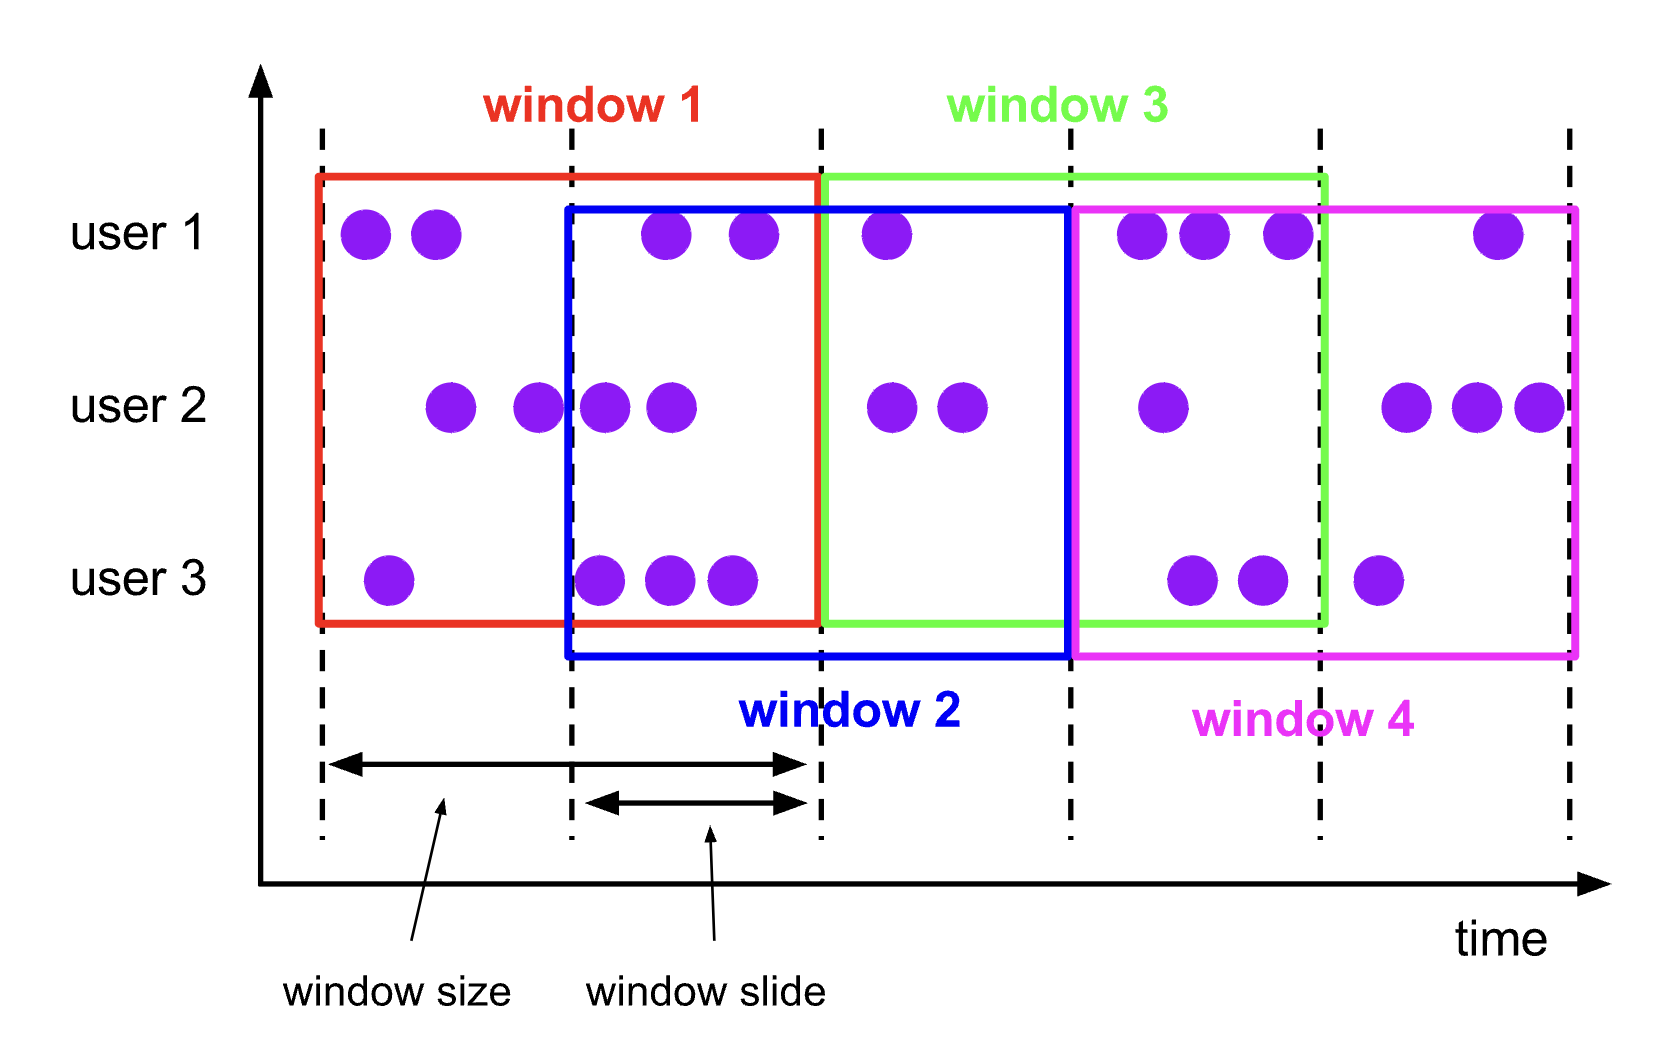
与滚动窗口类似,滑动窗口的 assigner 分发元素到指定大小的窗口,窗口大小通过 window size 参数设置。 滑动窗口需要一个额外的滑动距离(window slide)参数来控制生成新窗口的频率。 因此,如果 slide 小于窗口大小,滑动窗口可以允许窗口重叠。这种情况下,一个元素可能会被分发到多个窗口。
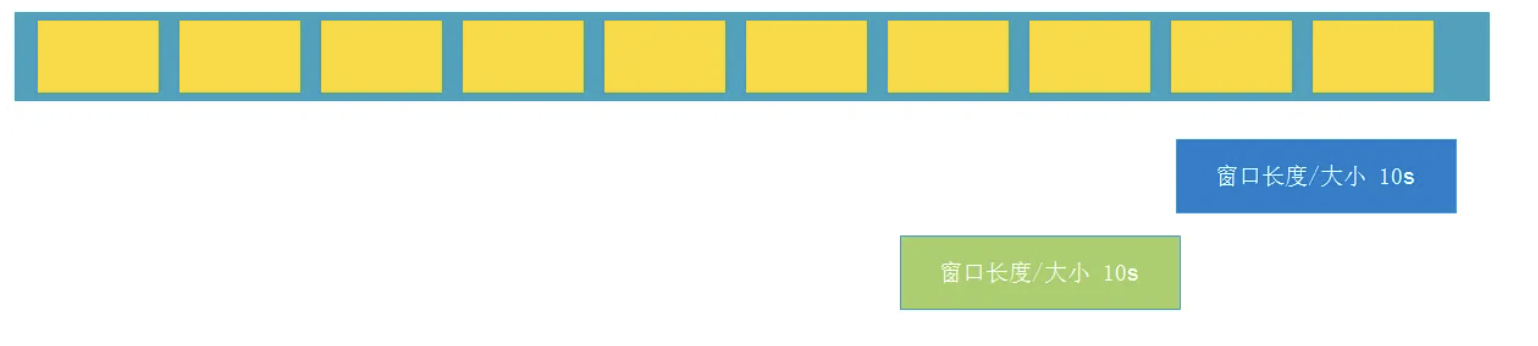
比如说,你设置了大小为 10 分钟,滑动距离 5 分钟的窗口,你会在每 5 分钟得到一个新的窗口, 里面包含之前 10 分钟到达的数据(如下图所示)。
下面的代码展示了如何使用滑动窗口。
DataStream<T> input = ...;

// 滑动 event-time 窗口
input
    .keyBy(<key selector>)
    .window(SlidingEventTimeWindows.of(Time.seconds(10), Time.seconds(5)))
    .<windowed transformation>(<window function>);

// 滑动 processing-time 窗口
input
    .keyBy(<key selector>)
    .window(SlidingProcessingTimeWindows.of(Time.seconds(10), Time.seconds(5)))
    .<windowed transformation>(<window function>);

// 滑动 processing-time 窗口,偏移量为 -8 小时
input
    .keyBy(<key selector>)
    .window(SlidingProcessingTimeWindows.of(Time.hours(12), Time.hours(1), Time.hours(-8)))
    .<windowed transformation>(<window function>);
时间间隔可以使用 Time.milliseconds(x)、Time.seconds(x)、Time.minutes(x) 等来指定。
如上一个例子所示,滚动窗口的 assigners 也可以传入可选的 offset 参数。这个参数可以用来对齐窗口。 比如说,不设置 offset 时,长度为一小时、滑动距离为 30 分钟的滑动窗口会与 linux 的 epoch 对齐。 你会得到如 1:00:00.000 - 1:59:59.999, 1:30:00.000 - 2:29:59.999 等。 如果你想改变对齐方式,你可以设置一个 offset。 如果设置了 15 分钟的 offset,你会得到 1:15:00.000 - 2:14:59.999、1:45:00.000 - 2:44:59.999 等。 一个重要的 offset 用例是根据 UTC-0 调整窗口的时差。比如说,在中国你可能会设置 offset 为 Time.hours(-8)。
ok,我们再来康一个实际例子
每隔1分钟,统计前面2分钟内通过的车辆数
对于这个需求我们可以看出,窗口长度是2分钟,每隔1分钟统计一次,窗口长度和时间间隔不相等,并且是大于关系,就是滑动窗口
或者:每通过100辆车,统计前面通过的50辆车的品牌占比
对于这个需求可以看出,窗口长度是50辆车,但是每隔100辆车统计一次
对于这样的窗口,我们称之为滑动窗口。
那么在这里面,统计多少数据是窗口长度(如统计2分钟内的数据,统计50辆车中的数据)
隔多久统计一次称之为滑动距离(如,每隔1分钟,每隔100辆车)
那么可以看出,滑动窗口的滑动距离不等于窗口长度
比如,每隔1分钟 统计先前5分钟的数据,窗口长度5分钟,滑动距离1分钟,不相等
比如,每隔100条数据,统计先前50条数据,窗口长度50条,滑动距离100条,不相等
那如果相等呢?相等就是比如:每隔1分钟统计前面1分钟的数据,窗口长度1分钟,滑动距离1分钟,相等。
对于这样的需求可以简化成:每隔1分钟统计一次数据,这就是前面说的滚动窗口
那么,我们可以看出:
滚动窗口:窗口长度= 滑动距离
滑动窗口:窗口长度!= 滑动距离
总结
其中可以发现,对于滑动窗口:
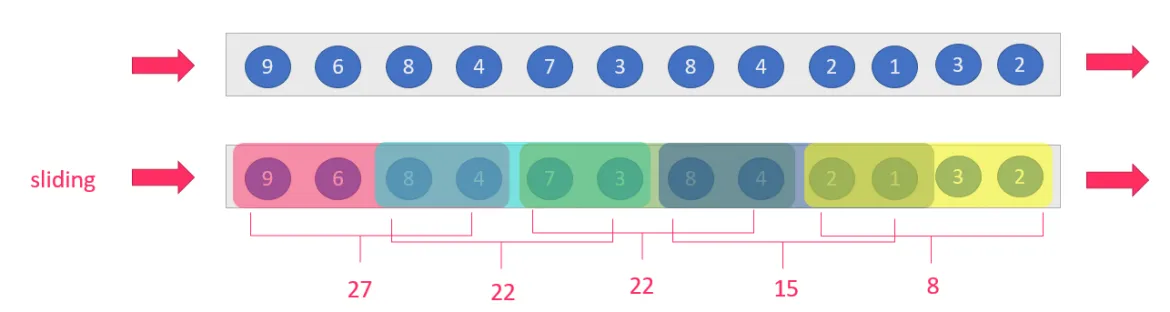
滑动距离> 窗口长度,会漏掉数据,比如:每隔5分钟,统计前面1分钟的数据(滑动距离5分钟,窗口长度1分钟,漏掉4分钟的数据)
滑动距离< 窗口长度,会重复处理数据,比如:每隔1分钟,统计前面5分钟的数据(滑动距离1分钟,窗口长度5分钟,重复处理4分钟的数据)
滑动距离= 窗口长度,不漏也不会重复,也就是滚动窗口
窗口的长度(大小) > 窗口的间隔 : 如每隔5s, 计算最近10s的数据 【滑动窗口】

窗口的长度(大小) = 窗口的间隔: 如每隔10s,计算最近10s的数据 【滚动窗口】
💡会话窗口
这个用得不多,我们直接看下官方的文档就OK啦
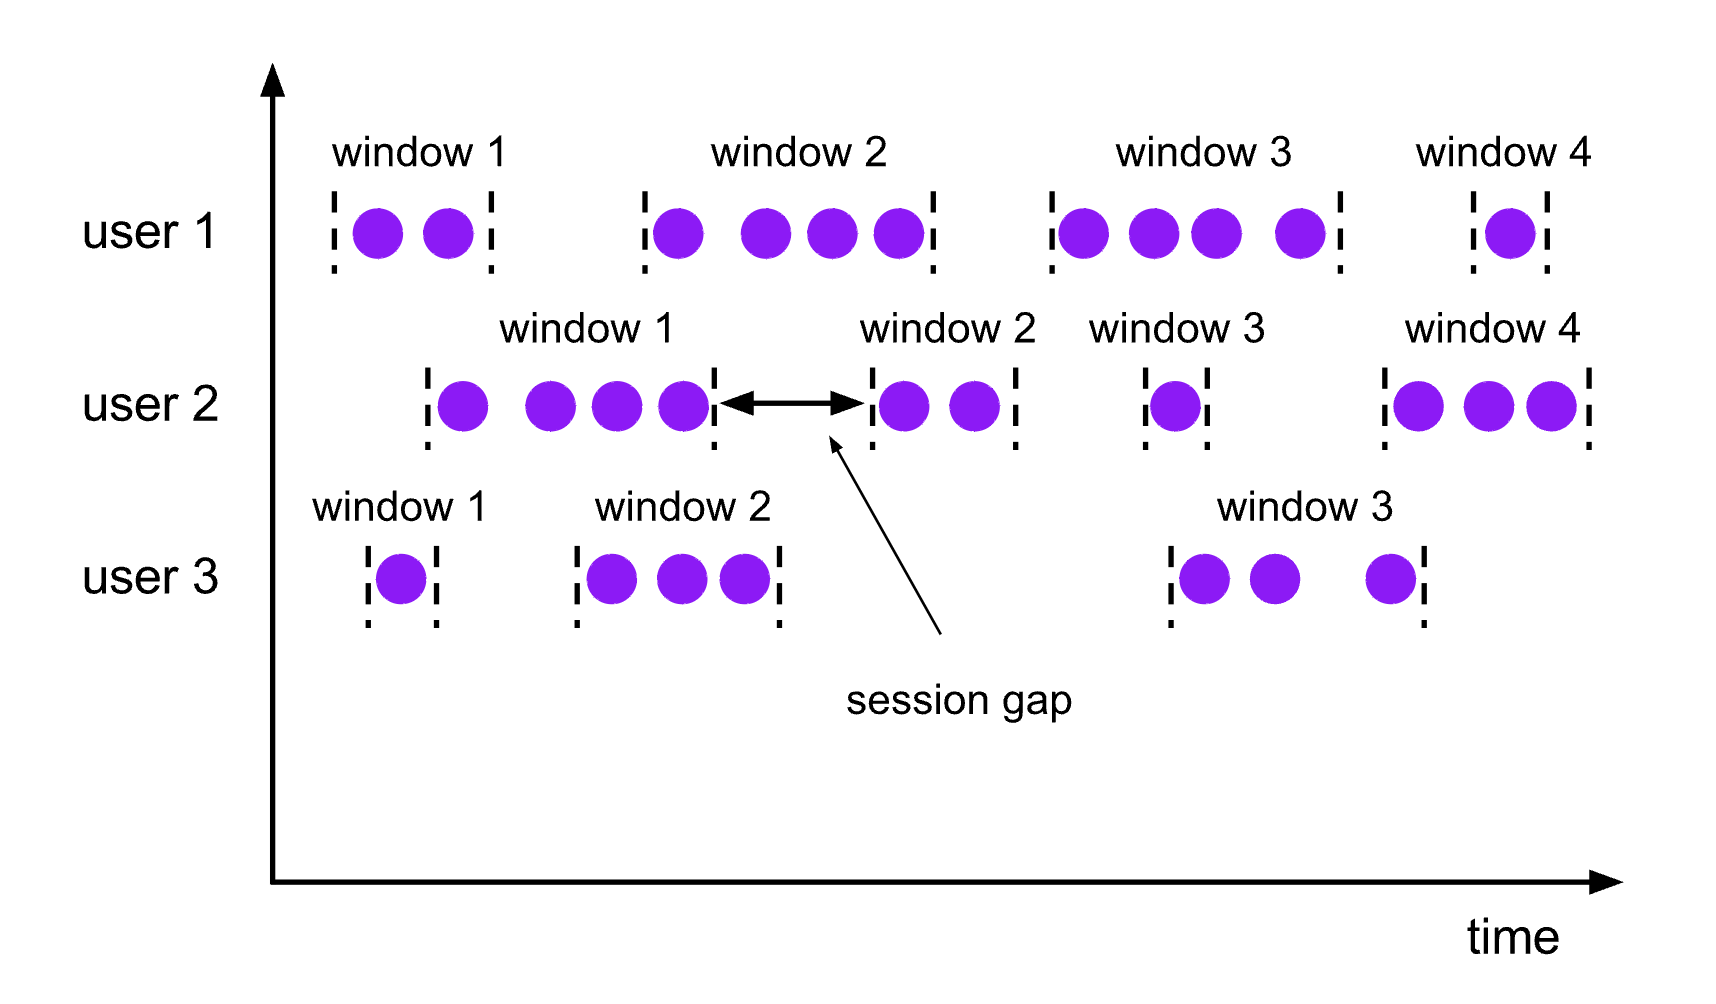
会话窗口的 assigner 会把数据按活跃的会话分组。 与滚动窗口和滑动窗口不同,会话窗口不会相互重叠,且没有固定的开始或结束时间。 会话窗口在一段时间没有收到数据之后会关闭,即在一段不活跃的间隔之后。 会话窗口的 assigner 可以设置固定的会话间隔(session gap)或 用 session gap extractor 函数来动态地定义多长时间算作不活跃。 当超出了不活跃的时间段,当前的会话就会关闭,并且将接下来的数据分发到新的会话窗口。
下面的代码展示了如何使用会话窗口。
DataStream<T> input = ...;

// 设置了固定间隔的 event-time 会话窗口
input
    .keyBy(<key selector>)
    .window(EventTimeSessionWindows.withGap(Time.minutes(10)))
    .<windowed transformation>(<window function>);

// 设置了动态间隔的 event-time 会话窗口
input
    .keyBy(<key selector>)
    .window(EventTimeSessionWindows.withDynamicGap((element) -> {
        // 决定并返回会话间隔
    }))
    .<windowed transformation>(<window function>);

// 设置了固定间隔的 processing-time session 窗口
input
    .keyBy(<key selector>)
    .window(ProcessingTimeSessionWindows.withGap(Time.minutes(10)))
    .<windowed transformation>(<window function>);

// 设置了动态间隔的 processing-time 会话窗口
input
    .keyBy(<key selector>)
    .window(ProcessingTimeSessionWindows.withDynamicGap((element) -> {
        // 决定并返回会话间隔
    }))
    .<windowed transformation>(<window function>);
【Tips】:固定间隔可以使用 Time.milliseconds(x)、Time.seconds(x)、Time.minutes(x) 等来设置。
动态间隔可以通过实现 SessionWindowTimeGapExtractor 接口来指定。
会话窗口并没有固定的开始或结束时间,所以它的计算方法与滑动窗口和滚动窗口不同。在 Flink 内部,会话窗口的算子会为每一条数据创建一个窗口, 然后将距离不超过预设间隔的窗口合并。 想要让窗口可以被合并,会话窗口需要拥有支持合并的 Trigger 和 Window Function, 比如说
ReduceFunction、AggregateFunction或ProcessWindowFunction。
🩷代码实战
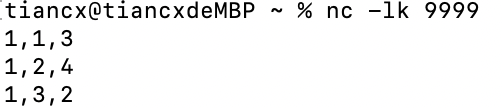
nc -lk 9999
有如下数据表示:
信号灯编号和通过该信号灯的车的数量
9,3
9,2
9,7
4,9
2,6
1,5
2,3
5,7
5,4
需求1:每5秒钟统计一次,最近5秒钟内,各个路口通过红绿灯汽车的数量–基于时间的滚动窗口
需求2:每5秒钟统计一次,最近10秒钟内,各个路口通过红绿灯汽车的数量–基于时间的滑动窗口
没有添加窗口的写法
/**
 * 没有添加窗口的写法
 */
public class NoWindowCarInfo {
    /**
     * 有如下数据表示:
     * 信号灯编号和通过该信号灯的车的数量
     * 9,3
     * 9,2
     */
    public static void main(String[] args) throws Exception {
        StreamExecutionEnvironment env = StreamExecutionEnvironment.getExecutionEnvironment();
        DataStreamSource<String> source = env.socketTextStream("127.0.0.1", 9999);
        source.map(new MapFunction<String, CarInfo>() {
            @Override
            public CarInfo map(String value) throws Exception {
                String[] split = value.split(",");
                return new CarInfo(Integer.parseInt(split[0]), Integer.parseInt(split[1]));
            }
        })
                .keyBy(CarInfo::getLightId)
                .sum("carNum")
                .print();
        env.execute();

    }

    @Data
    @AllArgsConstructor
    @NoArgsConstructor
    public static class CarInfo {
        // 信号灯编号
        private int lightId;
        // 通过该信号灯的车的数量
        private int carNum;
    }
}
TumblingWindow滚动窗口写法
/**
 * 滚动窗口的写法
 */
public class TumblingWindowCarInfo {
    /**
     * 有如下数据表示:
     * 信号灯编号和通过该信号灯的车的数量
     * 9,3
     * 9,2
     * 9,7
     * 4,9
     * 2,6
     * 1,5
     * 2,3
     * 5,7
     * 5,4
     * 需求1:每5秒钟统计一次,最近5秒钟内,各个路口通过红绿灯汽车的数量--基于时间的滚动窗口
     * 需求2:每5秒钟统计一次,最近10秒钟内,各个路口通过红绿灯汽车的数量--基于时间的滑动窗口
     */
    public static void main(String[] args) throws Exception {
        StreamExecutionEnvironment env = StreamExecutionEnvironment.getExecutionEnvironment();
        DataStreamSource<String> source = env.socketTextStream("127.0.0.1", 9999);
        source.map(new MapFunction<String, CarInfo>() {
            @Override
            public CarInfo map(String value) throws Exception {
                String[] split = value.split(",");
                return new CarInfo(Integer.parseInt(split[0]), Integer.parseInt(split[1]), LocalDateTime.now());
            }
        })
                .keyBy(CarInfo::getLightId)
                //每隔1分钟统计一次
                .window(TumblingProcessingTimeWindows.of(Time.minutes(1)))
                .sum("carNum")
                .print();
        env.execute();

    }

    @Data
    @AllArgsConstructor
    @NoArgsConstructor
    public static class CarInfo {
        // 信号灯编号
        private int lightId;
        // 通过该信号灯的车的数量
        private int carNum;
        //time
        private LocalDateTime time;
    }
}
SlidingWindow滑动窗口写法
/**
 * 滑动窗口的写法
 * @author tiancx
 */
public class SlidingWindowCarInfo {
    /**
     * 有如下数据表示:
     * 信号灯编号和通过该信号灯的车的数量
     * 9,3
     * 9,2
     * 9,7
     * 4,9
     * 2,6
     * 1,5
     * 2,3
     * 5,7
     * 5,4
     */
    public static void main(String[] args) throws Exception {
        StreamExecutionEnvironment env = StreamExecutionEnvironment.getExecutionEnvironment();
        DataStreamSource<String> source = env.socketTextStream("127.0.0.1", 9999);
        source.map(new MapFunction<String, CarInfo>() {
            @Override
            public CarInfo map(String value) throws Exception {
                String[] split = value.split(",");
                return new CarInfo(Integer.parseInt(split[0]), Integer.parseInt(split[1]), LocalDateTime.now());
            }
        })
                .keyBy(CarInfo::getLightId)
                //每隔10统计一次,最近20秒内的数据
                .window(SlidingProcessingTimeWindows.of(Time.seconds(20), Time.seconds(10)))
                .sum("carNum")
                .print();
        env.execute();

    }

    @Data
    @AllArgsConstructor
    @NoArgsConstructor
    public static class CarInfo {
        // 信号灯编号
        private int lightId;
        // 通过该信号灯的车的数量
        private int carNum;
        //time
        private LocalDateTime time;
    }
}
🚀窗口函数(Window Functions)
🚦概念
当我们定义了窗口分配器后,就知道数据落在哪些窗口中了,已经被收集起来了,当我们需要指定当窗口触发之后,如何计算每个窗口中的数据,这个时候就需要窗口函数了。
窗口函数有三种:ReduceFunction、AggregateFunction 或 ProcessWindowFunction。 前两者执行起来更高效(详见 State Size)因为 Flink 可以在每条数据到达窗口后 进行增量聚合(incrementally aggregate)。 而 ProcessWindowFunction 会得到能够遍历当前窗口内所有数据的 Iterable,以及关于这个窗口的 meta-information。
使用 ProcessWindowFunction 的窗口转换操作没有其他两种函数高效,因为 Flink 在窗口触发前必须缓存里面的所有数据。 ProcessWindowFunction 可以与 ReduceFunction 或 AggregateFunction 合并来提高效率。 这样做既可以增量聚合窗口内的数据,又可以从 ProcessWindowFunction 接收窗口的 metadata。 我们接下来看看每种函数的例子。
还有一种分发是氛围增量计算和全量计算
增量计算:指的是窗口保存一份中间数据,每流入一个新元素,新元素与中间数据两两合一,生成新的中间数据,再保存到窗口中。
全量计算:指的是窗口先缓存所有元素,等触发条件后才对窗口内的全量元素执行计算。
🏖️ReduceFunction
我们还是先看下官方概念:
ReduceFunction 指定两条输入数据如何合并起来产生一条输出数据,输入和输出数据的类型必须相同。 Flink 使用 ReduceFunction 对窗口中的数据进行增量聚合。
ReduceFunction可以像下面这样定义:
DataStream<Tuple2<String, Long>> input = ...;

input
    .keyBy(<key selector>)
    .window(<window assigner>)
    .reduce(new ReduceFunction<Tuple2<String, Long>>() {
      public Tuple2<String, Long> reduce(Tuple2<String, Long> v1, Tuple2<String, Long> v2) {
        return new Tuple2<>(v1.f0, v1.f1 + v2.f1);
      }
    });
上面的例子是对窗口内元组的第二个属性求和。
我们接下来自己写一个demo
需求:
我们定义一个实体类,有三个字段,Id,time,num,监听9999端口的输入,开一个10秒钟的窗口,统计对应ID在窗口中的总数(num的和)
代码清单
/**
 * @author tiancx
 */
public class ReduceFunctionDemo {
    public static void main(String[] args) throws Exception {
        StreamExecutionEnvironment env = StreamExecutionEnvironment.getExecutionEnvironment();
        DataStreamSource<String> stream = env.socketTextStream("127.0.0.1", 9999);
        stream
                .map((MapFunction<String, ReduceInfo>) value -> {
                    String[] split = value.split(",");
                    return new ReduceInfo(
                            Integer.parseInt(split[0])
                            , Long.parseLong(split[1])
                            , Integer.parseInt(split[2]));
                })
                .keyBy(ReduceInfo::getId)
                .window(TumblingProcessingTimeWindows.of(Time.seconds(10)))
                .reduce((ReduceInfo value1, ReduceInfo value2) -> {
                    System.out.println("调用reduce方法:" + value1 + "  " + value2);
                    return new ReduceInfo(value1.getId()
                            , value1.getTime()
                            , value1.getNum() + value2.getNum());
                })
                .print();

        env.execute();

    }

    @Data
    @AllArgsConstructor
    @NoArgsConstructor
    public static class ReduceInfo {
        //id
        private int id;
        //time
        private long time;
        //num
        private int num;
    }
}

结果

🏝️AggregateFunction
同样,我们还是来看下官方的例子
ReduceFunction 是 AggregateFunction 的特殊情况。 AggregateFunction 接收三个类型:输入数据的类型(IN)、累加器的类型(ACC)和输出数据的类型(OUT)。 输入数据的类型是输入流的元素类型,AggregateFunction 接口有如下几个方法: 把每一条元素加进累加器、创建初始累加器、合并两个累加器、从累加器中提取输出(OUT 类型)。我们通过下例说明。
与 ReduceFunction 相同,Flink 会在输入数据到达窗口时直接进行增量聚合。
AggregateFunction可以像下面这样定义:
/**
 * The accumulator is used to keep a running sum and a count. The {@code getResult} method
 * computes the average.
 */
private static class AverageAggregate
    implements AggregateFunction<Tuple2<String, Long>, Tuple2<Long, Long>, Double> {
  @Override
  public Tuple2<Long, Long> createAccumulator() {
    return new Tuple2<>(0L, 0L);
  }

  @Override
  public Tuple2<Long, Long> add(Tuple2<String, Long> value, Tuple2<Long, Long> accumulator) {
    return new Tuple2<>(accumulator.f0 + value.f1, accumulator.f1 + 1L);
  }

  @Override
  public Double getResult(Tuple2<Long, Long> accumulator) {
    return ((double) accumulator.f0) / accumulator.f1;
  }

  @Override
  public Tuple2<Long, Long> merge(Tuple2<Long, Long> a, Tuple2<Long, Long> b) {
    return new Tuple2<>(a.f0 + b.f0, a.f1 + b.f1);
  }
}

DataStream<Tuple2<String, Long>> input = ...;

input
    .keyBy(<key selector>)
    .window(<window assigner>)
    .aggregate(new AverageAggregate());
上例计算了窗口内所有元素第二个属性的平均值。
我们下面再来简单解释下:
AggregateFunction 比 ReduceFunction 更加的通用,它有三个参数:输入类型(IN)、累加器类型(ACC)和输出类型(OUT)。
输入类型是输入流中的元素类型,AggregateFunction有一个add方法可以将一个输入元素添加到一个累加器中。该接口还具有创建初始累加器(createAccumulator方法)、将两个累加器合并到一个累加器(merge方法)以及从累加器中提取输出(类型为OUT)的方法。
我们还是以上面ReduceFunction中的需求为例
代码清单
/**
 * @author tiancx
 */
public class AggregateFunctionDemo {
    public static void main(String[] args) throws Exception {
        StreamExecutionEnvironment env = StreamExecutionEnvironment.getExecutionEnvironment();
        DataStreamSource<String> stream = env.socketTextStream("127.0.0.1", 9999);
        stream
                .map((MapFunction<String, ReduceFunctionDemo.ReduceInfo>) value -> {
                    String[] split = value.split(",");
                    return new ReduceFunctionDemo.ReduceInfo(
                            Integer.parseInt(split[0])
                            , Long.parseLong(split[1])
                            , Integer.parseInt(split[2]));
                })
                .keyBy(ReduceFunctionDemo.ReduceInfo::getId)
                .window(TumblingProcessingTimeWindows.of(Time.seconds(10)))
                .aggregate(new AggregateFunction<ReduceFunctionDemo.ReduceInfo, Integer, Integer>() {
                    @Override
                    public Integer createAccumulator() {
                        System.out.println("创建累加器");
                        return 0;
                    }

                    @Override
                    public Integer add(ReduceFunctionDemo.ReduceInfo value, Integer accumulator) {
                        System.out.println("调用add方法:" + value + "  " + accumulator);
                        return value.getNum() + accumulator;
                    }

                    @Override
                    public Integer getResult(Integer accumulator) {
                        System.out.println("调用getResult方法:" + accumulator);
                        return accumulator;
                    }

                    @Override
                    public Integer merge(Integer a, Integer b) {
                        System.out.println("调用merge方法:" + a + "  " + b);
                        return 0;
                    }
                })
                .print();
        env.execute();

    }

    @Data
    @AllArgsConstructor
    @NoArgsConstructor
    public static class ReduceInfo {
        //id
        private int id;
        //time
        private long time;
        //num
        private int num;
    }
}

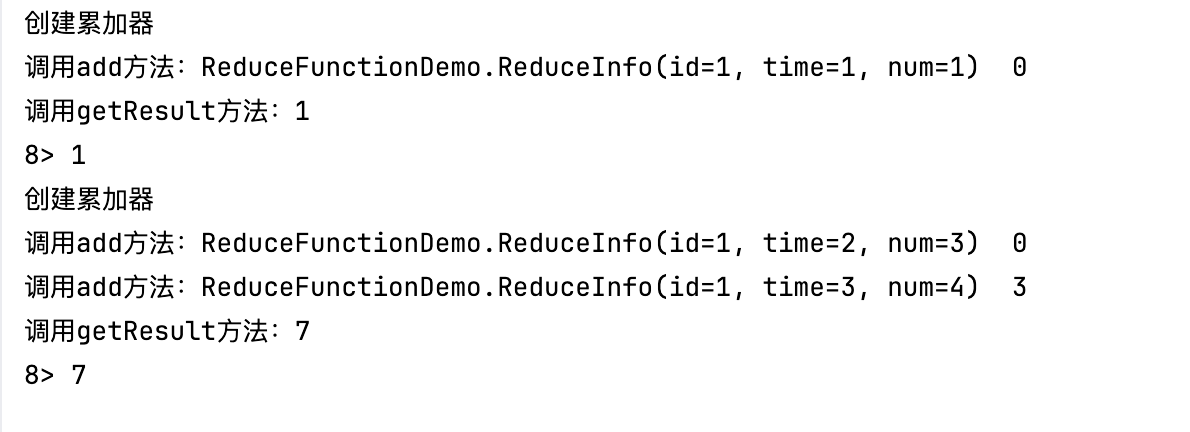
结果如下
🏜️ProcessWindowFunction
先看下官方的解释
ProcessWindowFunction 有能获取包含窗口内所有元素的 Iterable, 以及用来获取时间和状态信息的 Context 对象,比其他窗口函数更加灵活。 ProcessWindowFunction 的灵活性是以性能和资源消耗为代价的, 因为窗口中的数据无法被增量聚合,而需要在窗口触发前缓存所有数据。
ProcessWindowFunction的签名如下:
public abstract class ProcessWindowFunction<IN, OUT, KEY, W extends Window> implements Function {

    /**
     * Evaluates the window and outputs none or several elements.
     *
     * @param key The key for which this window is evaluated.
     * @param context The context in which the window is being evaluated.
     * @param elements The elements in the window being evaluated.
     * @param out A collector for emitting elements.
     *
     * @throws Exception The function may throw exceptions to fail the program and trigger recovery.
     */
    public abstract void process(
            KEY key,
            Context context,
            Iterable<IN> elements,
            Collector<OUT> out) throws Exception;

    /**
     * Deletes any state in the {@code Context} when the Window expires (the watermark passes its
     * {@code maxTimestamp} + {@code allowedLateness}).
     *
     * @param context The context to which the window is being evaluated
     * @throws Exception The function may throw exceptions to fail the program and trigger recovery.
     */
    public void clear(Context context) throws Exception {}

    /**
     * The context holding window metadata.
     */
    public abstract class Context implements java.io.Serializable {
        /**
         * Returns the window that is being evaluated.
         */
        public abstract W window();

        /** Returns the current processing time. */
        public abstract long currentProcessingTime();

        /** Returns the current event-time watermark. */
        public abstract long currentWatermark();

        /**
         * State accessor for per-key and per-window state.
         *
         * <p><b>NOTE:</b>If you use per-window state you have to ensure that you clean it up
         * by implementing {@link ProcessWindowFunction#clear(Context)}.
         */
        public abstract KeyedStateStore windowState();

        /**
         * State accessor for per-key global state.
         */
        public abstract KeyedStateStore globalState();
    }

}
key 参数由 keyBy() 中指定的 KeySelector 选出。 如果是给出 key 在 tuple 中的 index 或用属性名的字符串形式指定 key,这个 key 的类型将总是 Tuple, 并且你需要手动将它转换为正确大小的 tuple 才能提取 key。
ProcessWindowFunction可以像下面这样定义:
DataStream<Tuple2<String, Long>> input = ...;

input
  .keyBy(t -> t.f0)
  .window(TumblingEventTimeWindows.of(Time.minutes(5)))
  .process(new MyProcessWindowFunction());

/* ... */

public class MyProcessWindowFunction
    extends ProcessWindowFunction<Tuple2<String, Long>, String, String, TimeWindow> {

  @Override
  public void process(String key, Context context, Iterable<Tuple2<String, Long>> input, Collector<String> out) {
    long count = 0;
    for (Tuple2<String, Long> in: input) {
      count++;
    }
    out.collect("Window: " + context.window() + "count: " + count);
  }
}
上例使用 ProcessWindowFunction 对窗口中的元素计数,并且将窗口本身的信息一同输出。
注意,使用
ProcessWindowFunction完成简单的聚合任务是非常低效的。后面会说明如何将ReduceFunction或AggregateFunction与ProcessWindowFunction组合成既能 增量聚合又能获得窗口额外信息的窗口函数。
我们再来解析下:
ProcessWindowFunction就是全量聚合窗口,等所有数据都齐了才进行聚合计算。
ProcessWindowFunction 是 Window API 中最底层的通用窗口函数接口。之所以说它“最底层”,是因为除了可以拿到窗口中的所有数据之外,ProcessWindowFunction 还可以获取到一个“上下文对象”(Context)。这个上下文对象非常强大,不仅能够获取窗口信息,还可以访问当前的时间和状态信息。这里的时间就包括了处理时间(processing time)和事件时间水位线(event time watermark)。
再来看一下我们的demo
实现的功能和上一节的一样
代码清单
/**
 * @author tiancx
 */
public class ProcessWindowFunctionDemo {
    public static void main(String[] args) throws Exception {
        StreamExecutionEnvironment env = StreamExecutionEnvironment.getExecutionEnvironment();
        DataStreamSource<String> stream = env.socketTextStream("127.0.0.1", 9999);
        stream
                .map((MapFunction<String, ProcessWindowFunctionDemo.ProcessInfo>) value -> {
                    String[] split = value.split(",");
                    return new ProcessWindowFunctionDemo.ProcessInfo(
                            Integer.parseInt(split[0])
                            , Long.parseLong(split[1])
                            , Integer.parseInt(split[2]));
                })
                .keyBy(ProcessWindowFunctionDemo.ProcessInfo::getId)
                .window(TumblingProcessingTimeWindows.of(Time.seconds(10)))
                .process(new ProcessWindowFunction<ProcessInfo, Integer, Integer, TimeWindow>() {
                    @Override
                    public void process(Integer key
                            , ProcessWindowFunction<ProcessInfo, Integer, Integer, TimeWindow>.Context context
                            , Iterable<ProcessInfo> elements, Collector<Integer> out) throws Exception {
                        System.out.println("调用process方法:key:" + key + "\n" + "elements:" + elements);
                        int sum = 0;
                        for (ProcessInfo element : elements) {
                            sum += element.getNum();
                        }
                        out.collect(sum);
                    }
                })
                .print();
        env.execute();

    }

    @Data
    @AllArgsConstructor
    @NoArgsConstructor
    public static class ProcessInfo {
        //id
        private int id;
        //time
        private long time;
        //num
        private int num;
    }
}

运行结果如下

⛰️增量聚合的 ProcessWindowFunction
官方定义
ProcessWindowFunction 可以与 ReduceFunction 或 AggregateFunction 搭配使用, 使其能够在数据到达窗口的时候进行增量聚合。当窗口关闭时,ProcessWindowFunction 将会得到聚合的结果。 这样它就可以增量聚合窗口的元素并且从 ProcessWindowFunction 中获得窗口的元数据。
🏔️使用 ReduceFunction 增量聚合
下例展示了如何将 ReduceFunction 与 ProcessWindowFunction 组合,返回窗口中的最小元素和窗口的开始时间。
DataStream<SensorReading> input = ...;

input
  .keyBy(<key selector>)
  .window(<window assigner>)
  .reduce(new MyReduceFunction(), new MyProcessWindowFunction());

// Function definitions

private static class MyReduceFunction implements ReduceFunction<SensorReading> {

  public SensorReading reduce(SensorReading r1, SensorReading r2) {
      return r1.value() > r2.value() ? r2 : r1;
  }
}

private static class MyProcessWindowFunction
    extends ProcessWindowFunction<SensorReading, Tuple2<Long, SensorReading>, String, TimeWindow> {

  public void process(String key,
                    Context context,
                    Iterable<SensorReading> minReadings,
                    Collector<Tuple2<Long, SensorReading>> out) {
      SensorReading min = minReadings.iterator().next();
      out.collect(new Tuple2<Long, SensorReading>(context.window().getStart(), min));
  }
}
ok,我们再来看一个例子
统计对应ID在窗口中最小的值以及开窗的时间
/**
 * @author tiancx
 */
public class ReduceProcessDemo {
    public static void main(String[] args) throws Exception {
        StreamExecutionEnvironment env = StreamExecutionEnvironment.getExecutionEnvironment();
        DataStreamSource<String> stream = env.socketTextStream("127.0.0.1", 9999);
        stream.map(new MapFunction<String, ReduceProcessInfo>() {
                    @Override
                    public ReduceProcessInfo map(String value) throws Exception {
                        String[] split = value.split(",");
                        return new ReduceProcessInfo(
                                Integer.parseInt(split[0])
                                , Long.parseLong(split[1])
                                , Integer.parseInt(split[2]));
                    }
                })
                .keyBy(ReduceProcessInfo::getId)
                .window(TumblingProcessingTimeWindows.of(Time.seconds(10)))
                .reduce(new MyReduceFunction(), new MyProcessFunction())
                .print();
        env.execute();
    }

    @Data
    @AllArgsConstructor
    @NoArgsConstructor
    public static class ReduceProcessInfo {
        //id
        private int id;
        //time
        private long time;
        //num
        private int num;
    }

    public static class MyProcessFunction extends ProcessWindowFunction<ReduceProcessInfo, Tuple2<Integer, String>, Integer, TimeWindow> {

        @Override
        public void process(Integer key, ProcessWindowFunction<ReduceProcessInfo, Tuple2<Integer, String>, Integer, TimeWindow>.Context context, Iterable<ReduceProcessInfo> elements, Collector<Tuple2<Integer, String>> out) throws Exception {
            System.out.println("调用process方法:key:" + key + "\n" + "elements:" + elements);
            ReduceProcessInfo next = elements.iterator().next();
            out.collect(new Tuple2<>(key, "next:" + next + ", window-time:" + context.window().getStart()));
        }
    }

    public static class MyReduceFunction implements ReduceFunction<ReduceProcessInfo> {

        @Override
        public ReduceProcessInfo reduce(ReduceProcessInfo value1, ReduceProcessInfo value2) throws Exception {
            System.out.println("调用reduce方法:" + value1 + "  " + value2);
            return value1.num < value2.num ? value1 : value2;
        }
    }

}
运行看结果

🗻使用 AggregateFunction 增量聚合
下例展示了如何将 AggregateFunction 与 ProcessWindowFunction 组合,计算平均值并与窗口对应的 key 一同输出。
DataStream<Tuple2<String, Long>> input = ...;

input
  .keyBy(<key selector>)
  .window(<window assigner>)
  .aggregate(new AverageAggregate(), new MyProcessWindowFunction());

// Function definitions

/**
 * The accumulator is used to keep a running sum and a count. The {@code getResult} method
 * computes the average.
 */
private static class AverageAggregate
    implements AggregateFunction<Tuple2<String, Long>, Tuple2<Long, Long>, Double> {
  @Override
  public Tuple2<Long, Long> createAccumulator() {
    return new Tuple2<>(0L, 0L);
  }

  @Override
  public Tuple2<Long, Long> add(Tuple2<String, Long> value, Tuple2<Long, Long> accumulator) {
    return new Tuple2<>(accumulator.f0 + value.f1, accumulator.f1 + 1L);
  }

  @Override
  public Double getResult(Tuple2<Long, Long> accumulator) {
    return ((double) accumulator.f0) / accumulator.f1;
  }

  @Override
  public Tuple2<Long, Long> merge(Tuple2<Long, Long> a, Tuple2<Long, Long> b) {
    return new Tuple2<>(a.f0 + b.f0, a.f1 + b.f1);
  }
}

private static class MyProcessWindowFunction
    extends ProcessWindowFunction<Double, Tuple2<String, Double>, String, TimeWindow> {

  public void process(String key,
                    Context context,
                    Iterable<Double> averages,
                    Collector<Tuple2<String, Double>> out) {
      Double average = averages.iterator().next();
      out.collect(new Tuple2<>(key, average));
  }
}
🧡Triggers
触发器主要是用来控制窗口什么时候触发计算。所谓的“触发计算”,本质上就是执行窗口函数,所以可以认为是计算得到结果并输出的过程。
基 于 WindowedStream 调 用 .trigger() 方 法 , 就 可 以 传 入 一 个 自 定 义 的 窗 口 触 发 器(Trigger)。
Trigger 接口提供了五个方法来响应不同的事件:
onElement()方法在每个元素被加入窗口时调用。onEventTime()方法在注册的 event-time timer 触发时调用。onProcessingTime()方法在注册的 processing-time timer 触发时调用。onMerge()方法与有状态的 trigger 相关。该方法会在两个窗口合并时, 将窗口对应 trigger 的状态进行合并,比如使用会话窗口时。- 最后,
clear()方法处理在对应窗口被移除时所需的逻辑。
有两点需要注意:
- 前三个方法通过返回
TriggerResult来决定 trigger 如何应对到达窗口的事件。应对方案有以下几种:
CONTINUE: 什么也不做FIRE: 触发计算PURGE: 清空窗口内的元素FIRE_AND_PURGE: 触发计算,计算结束后清空窗口内的元素
2.上面的任意方法都可以用来注册 processing-time 或 event-time timer。
💛Evictors
移除器主要用来定义移除某些数据的逻辑。基于 WindowedStream 调用.evictor()方法,就可以传入一个自定义的移除器(Evictor)。Evictor 是一个接口,不同的窗口类型都有各自预实现的移除器。
Flink 的窗口模型允许在 WindowAssigner 和 Trigger 之外指定可选的 Evictor。 如本文开篇的代码中所示,通过 evictor(...) 方法传入 Evictor。 Evictor 可以在 trigger 触发后、调用窗口函数之前或之后从窗口中删除元素。 Evictor 接口提供了两个方法实现此功能:
/**
 * Optionally evicts elements. Called before windowing function.
 *
 * @param elements The elements currently in the pane.
 * @param size The current number of elements in the pane.
 * @param window The {@link Window}
 * @param evictorContext The context for the Evictor
 */
void evictBefore(Iterable<TimestampedValue<T>> elements, int size, W window, EvictorContext evictorContext);

/**
 * Optionally evicts elements. Called after windowing function.
 *
 * @param elements The elements currently in the pane.
 * @param size The current number of elements in the pane.
 * @param window The {@link Window}
 * @param evictorContext The context for the Evictor
 */
void evictAfter(Iterable<TimestampedValue<T>> elements, int size, W window, EvictorContext evictorContext);
evictBefore() 包含在调用窗口函数前的逻辑,而 evictAfter() 包含在窗口函数调用之后的逻辑。 在调用窗口函数之前被移除的元素不会被窗口函数计算。
Flink 内置有三个 evictor:
CountEvictor: 仅记录用户指定数量的元素,一旦窗口中的元素超过这个数量,多余的元素会从窗口缓存的开头移除DeltaEvictor: 接收DeltaFunction和threshold参数,计算最后一个元素与窗口缓存中所有元素的差值, 并移除差值大于或等于threshold的元素。TimeEvictor: 接收interval参数,以毫秒表示。 它会找到窗口中元素的最大 timestampmax_ts并移除比max_ts - interval小的所有元素。
默认情况下,所有内置的 evictor 逻辑都在调用窗口函数前执行。
指定一个 evictor 可以避免预聚合,因为窗口中的所有元素在计算前都必须经过 evictor。
Flink 不对窗口中元素的顺序做任何保证。也就是说,即使 evictor 从窗口缓存的开头移除一个元素,这个元素也不一定是最先或者最后到达窗口的。
【都看到这了,点点赞点点关注呗,爱你们】😚😚

✨ 正在努力的小叮当~
💖 超级爱分享,分享各种有趣干货!
👩💻 提供:模拟面试 | 简历诊断 | 独家简历模板
🌈 感谢关注,关注了你就是我的超级粉丝啦!
🔒 以下内容仅对你可见~作者:小叮当撩代码,CSDN后端领域新星创作者 |阿里云专家博主
CSDN个人主页:小叮当撩代码
🔎GZH:
哆啦A梦撩代码🎉欢迎关注🔎点赞👍收藏⭐️留言📝